.
Showing posts with label WordPress Tips. Show all posts

Multi network wordpress sites

The Benefits of WordPress Multisite

For us, enabling multisite was a huge win. By going with multisite, we were able to take advantage of many benefits. WordPress multisite allows you to:
  • Share one custom theme among all of your multisite blogs. We made slight adjustments to each of them using child themes.
  • Share one set of authors. There is only one username/password combination for each user, plus one profile to manage.
  • Distribute plugins across all blogs, rather than managing them individually for each install. This goes for WordPress updates as well.
  • Simplify the blogging process. By logging into one blog, we have access to each of them.

The Process

The actual process of converting a site to multisite (http://codex.wordpress.org/Create_A_Network) is pretty easy. It only takes a few minutes. If you are going to do it, however, you should be aware that it will require changes to your .htaccess file and core WordPress configuration files. Be sure to proceed with caution, and make sure you have a backup of your site.
You will need FTP access to your WordPress installation.

Step 1 – Enable Multisite

[Callout "Add define('WP_ALLOW_MULTISITE', true); to your  wp-config.php file above where it says /* That’s all, stop editing! Happy blogging. */:"]
define(‘WP_ALLOW_MULTISITE’, true);
Add define(‘WP_ALLOW_MULTISITE’, true); to your wp-config.php file to enable multisite.
Once you’ve made the change, save the file, and upload it using FTP into the parent folder of your blog.

Step 2 – Network Setup

You’ve successfully enabled WordPress multisite, but now you will need to make some configurations.
WordPress Network Setup menu
Access the new Network Setup page in your Tools menu.
[Callout "Log into your WordPress site with your administrator account. You should now see that 'Network Setup' has been added to your Tools menu item."]
WordPress multisite Network Setup
In the Network Setup area, you will be able to make key decisions about your site.
The major decision that you will need to make will be between sub-domains and sub-directories. It is important to note that once you make this change, you will will not be able to change it.
  • Sub-domains: a domain-based network in which on-demand sites use subdomains. (newblog.yourdomain.com)
  • Sub-directories: a path-based network in which on-demand sites use paths. (yourdomain.com/newblog)
Because we were already running our blog out of a sub-directory (/blog), we only had one option, and that was to add an additional sub-directory. So, we ended up with:
* /blog – Original marketing blog
* /blog/team – New team blog
* /blog/dev – New development blog
Admittedly, this is not the best structure in the world for SEO purposes, although we believe that it still beats the use of sub-domians, which can have a negative impact on building PageRank. We improved the situation by creating a few custom 301 redirects in our parent .htaccess file.
Redirect 301 /bangla /blog/bangla
Redirect 301 /english /blog/english
This allows us to use the short URLs http://sajubd.com/bangla and http://sajubd.com/english to access our blogs. There are better ways to solve this problem, but for us, this was an acceptable solution.

Step 3 – Enabling The Network

Once you’ve made your decision on sub-domains or sub-directories, you will need to make some significant changes to your .htaccess and wp-config.php files. These changes will vary depending upon your specific installation, so be sure to follow the customized WordPress instructions that are provided.
Enabling the Network
Complete the following steps to enable the features for creating a network of sites.
Once you are done, your wp-config.php and .htaccess files will look something like this:
Editing your wp-config.php file to enable multisite.
Add the code that your WordPress installation generates into your wp-config.php
Edit your WordPress .htaccess file
The configuration of your particular .htaccess will vary depending on your network.
[Callout "Complete the instructions provided by WordPress. Once you complete these steps, your network is enabled and configured. You will have to log in again."]

Step 4 – Network Admin Dashboard

Once you have logged back into your WordPress install, you will be able to see a few new menu options in the WordPress Admin Bar.
WordPress Admin Bar after multisite install.
You will see a whole new world in the Network Admin area of your WordPress menu bar.
From the ‘Network Admin’ dashboard, you will be able to add new sites, and configure your shared plugins, users and themes. There will be some new principles to familiarize yourself with, but the main thing that you need understand is that settings on the network level will automatically apply themselves to the new blogs, unless you specify otherwise. WordPress provides a lot of additional information about how to manage your new WordPress multisite.

Sharing Themes & Plugins

You can share your themes and plugins with all of your new blogs/sites very easily from the Network Dashboard.
How to network enable WordPress themes.
By setting a theme to network enable, it will be available throughout all of your new sites.
More about how themes are enabled and shared can be found here. You can see above that we enabled our parent theme and child themes across the entire network. This means that our parent theme will be managed and updated from a single place, while being applied to each of our new blogs. Individual customizations were added for each of the new blogs using a child theme.
How to network active your plugins
Once you have a multisite, plugins can be automatically enabled for each blog, or left to individual installation.
Like themes, plugins can be shared automatically among your blogs, or left to individual installation. It is important to note that the individual settings that the plugins require will be left to the admin panel for each new blog. This allows you to update and manage one installation of the plugin while offering a wide range of setting options.

A Note About Permalinks

The only trouble that we encountered with our multisite conversation was related to the structure of the permalinks. Traditionally, we have always used /blog/%postname%/ for our primary blog. Because we were already using a subdirectory for our blog, WordPress wanted to insert a second /blog subdirectory in our url. Resulting in something like this /blog/blog/%postname%/.
Needless to say, this broke all of the old links on our site. The issue was not easily solved, due to some oddities with WordPress itself. Ultimately the fix for use was as simple as doing things in the correct order:
1. At blog site set Settings -> Permalinks -> Common Setting -> Default
2. At Network Admin -> Sites -> (root site) Permalink Sturcture -> /%category%/%post_id%

How to Install WordPress Manually


Step 1: Download WordPress

  1. Download the WordPress package to your local computer from http://wordpress.org/download/.
  2. Unzip the downloaded file to a folder on your local computer.

Step 2: Upload WordPress to Hosting Account

There are three available options for uploading WordPress to a hosting account.

Step 3: Create MySQL Database and User

WordPress stores its information in a database. Therefore, a database will need to be created.
  1. Log into cPanel.
  2. In the Databases section, click the MySQL Database Wizard icon.
  3. For Step 1: Create A Database, enter the database name and click Next Step.
  4. For Step 2: Create Database Users, enter the database user name and password and click Create User.
  5. For Step 3: Add User to the Database, click the All Privileges checkbox and click Next Step.
  6. For Step 4: Complete the task, make note of the database name, username and password, as you will need them for Step 4See Below below.

Step 4: Configure wp-config.php

The wp-config-sample.php file contains the database information and tells the WordPress application which database to pull information from. This step must be completed to ensure the correct database information is associated with the WordPress installation.
The wp-config-sample.php file can be found in File Manager in the folder where WordPress is installed. To modify the file:
  1. Log into cPanel.
  2. In the Files section, click the File Manager icon.
  3. In the pop-up box, select Web Root and check the box  for Show Hidden Files (dotfiles), then click Go.
    If you don't see the pop-up box, you may have selected the "Skip this question, and always open this directory in the future when opening File Manager" option.

    To make the pop-up reappear, simply click reset all interface settings at the very bottom of your cPanel.
  4. From the left navigation menu in File Manager, click public_html to expand the folder.
  5. Click the folder containing the Wordpress installation.
  6. On the right side of the File Manager screen, locate the wp-config-sample.php file.
  7. Right click on the file, select Rename and change the name of the file to wp-config.php. Click the Rename File button.
  8. Right-click on the wp-config.php file and select Code Edit. When the file opens, look for the following information:
    define('DB_NAME', 'database_name_here');

    /** MySQL database username */
    define('DB_USER', 'username_here');

    /** MySQL database password */
    define('DB_PASSWORD', 'password_here');
    1. Replace database_name_here with the name of the database you created (above in Step 3: Create MySQL Database and User See Below).
    2. Replace username_here with the username of the database you created.
    3. Replace password_here with the password of the database that you created.
  9. When done editing, click the Save Changes button, then close the file.

Step 5: Run the Installation

Open a new browser window and go to the installation page to run the installation script. Depending on where you installed the script, you will find it at either of the following URLs:
http://yourdomain.com/wp-admin/install.php
http://yourdomain.com/blog/wp-admin/install.php
Be sure to replace yourdomain.com in the example above with your actual domain name.
You should now see a welcome page that says "Welcome to the famous five minute WordPress installation process!"

Step 6: Complete the Installation

On this page, fill in the fields for:
  • Site Name
  • Username
  • Password (needs to be entered twice)
  • Email address (login information will be sent to this email address)
  • Select whether or not to have the search engines index the site
Click Install Now, and you should be taken to the final screen, showing the following message:
Success! WordPress has been installed.

A Step by Step Guide to Setting Up Your WordPress Blog

WordPress can be overwhelming to the newcomer. And even for those of us who are more experienced, it is difficult to remember every single one of the little tweaks that you need to make to get things in order.
Fortunately, we have done all the hard work for you. Today we are going to walk you through all of the essential changes that you should make to the settings of a brand new WordPress blog. And once that’s taken care of, we are going to show you why you never need to go through this process again.
Time’s a wastin’, so let’s get to it!

Step 1 – Install WordPress

If you don’t actually know how to bring a website into existence, do not fear. It is a remarkably straightforward process. You can actually purchase a domain and hosting, install WordPress, and publish a post – all within 4 minutes. Don’t believe me? Check this video out:
As you can see, you can have a WordPress site up and running within minutes. And if you go with a popular hosting provider such as Bluehost or Hostgator (which we would recommend), the WordPress installation process can be completed with just a few clicks.

Step 2 – Plugins

You can access your plugins screen by hitting the “Plugins” option in the sidebar. A standard WordPress install currently comes bundled with three WordPress plugins:
  • Akismet
  • Hello Dolly
  • Jetpack
Akismet is an excellent anti-spam tool that you will likely want for your blog. Just follow the instructions on the Plugins screen to get it up and running:
WordPress Setup
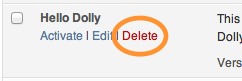
Hello Dolly is completely useless. Do yourself a favor and hit Delete:
WordPress Setup
Bye bye. You will not be missed.
You may or may not be interested by Jetpack’s features. Click here to find out more.

Step 2 – Set Up ManageWP

The next thing you will want to do is add your blog to your ManageWP account so that you can manage it remotely along with your other sites. Don’t have a ManageWP account yet? Click here to start your free trial!
Adding your blog to ManageWP is a piece of cake. Just read these two short guides and you will be up and running within minutes:

Step 3 – Your User Profile

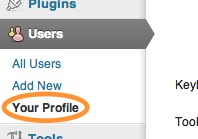
Setting up your user profile is an important step that many people miss. Depending upon your theme, some of your user profile data can be displayed publicly on your site, so you will want to make sure that it is all in good order. Go ahead and click on “Users > Your Profile” in the sidebar:
WordPress Setup
We recently published a post featuring 5 handy WordPress features you might not know about – check out tip number 1 for how you should name your profile.
Secondly, you may wish to alter the contact information fields within the user profiles screen. This is a piece of cake – just read this article to find out how you can do this.

Step 4 – Settings

This is where the bulk of your adjustments should be made. WordPress is very good at allowing you to display your content in a variety of ways, and it is in the settings screens that you will make your first few adjustments to get things looking the wayyou like.
You can access the settings screens via your sidebar. There are a huge number of options, but we are going to address only the most important ones.

General

Naming your blog is typically seen as rather important, and it is in this screen that you will do the honors. You should also choose a tagline for your blog, or remove the default tagline if you do not wish to have one.
Additionally, you will want to make sure that the email address in the General Settings screen is set correctly, otherwise you will not receive notifications from WordPress regarding your blog.
Finally, make sure that you get the timezone and date format set correctly. You are likely to get confused rather quickly if dates and times aren’t presented in the correct manner.

Writing

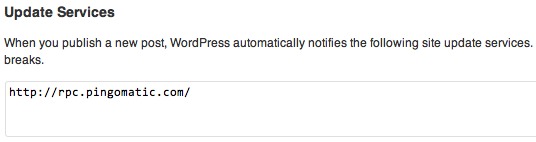
There are no absolutely necessary adjustments to make within the Writing Settings screen, but you should take the opportunity to update your ping list:
WordPress Setup
This.
This is where you should place a list of site update services (which WordPress will automatically inform when you have made a change to your blog). For a list of recommended URLs to add to the list, click here.

Reading

On this screen, you can make the decision as to whether or not your blog’s homepage is a static page, or a display of your latest posts. Most blogs are the latter, so if you are in any doubt, leave the setting as it is.
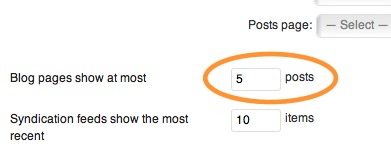
One change that we always recommend you make is to reduce the number of blog posts shown on your home page to 5:
WordPress Setup
Load time is extremely important when it comes to creating a successful blog, and changing this setting is a simple way of improving that factor, with no downside.
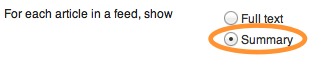
Finally, we recommend that you select post summaries to be shown, rather than the full text:
WordPress Setup
For an in-depth explanation as to why you should use blog excerpts, and how to use them most effectively, click here.

Discussion

This screen handles everything to do with the interaction between you and your readers.
The most important options on this page are the first three:
WordPress Setup
You will want to keep the first option checked – there is no downside to notifying other blogs of you linking to them.
However, you will want to consider whether or not people will be able to place pingbacks or trackbacks on your blog. For more information on trackbacks (and how you can utilize them to boost your blog’s exposure), click here.
Most importantly, you need to decide whether or not you want to allow comments on your blog posts. Simply unchecking the third box pictured above will remove that option. Most blogs have comments enabled, but if for whatever reason you do not want them on your site, this is where you turn them off.
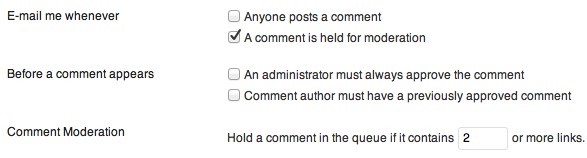
The rest of the options on this page are tweaks relating to the presentation of blog post comments, in addition to moderation and notification settings. If you want to retain your sanity, you will probably want to turn off comment notification. Ensure that the following boxes are as such:
WordPress Setup

Permalinks

It is really important that you get your permalinks structure right for more reasons than we have time to go into here. Fortunately, doing so is a piece of cake.
The recommended format for your permalinks is simply the post name:
WordPress Setup
This is great for your onsite SEO and also makes logical sense for anyone navigating your site.

That’s It!

Those are the key changes you need to make to any new WordPress blog. Sure, there are a whole load of other things you can do, but the above options are the most important.
Just one more thing before you leave. Wouldn’t it be much better to start with a site that already has your preferred default settings in place, rather than making all of the above changes every time you start up a new site? The efficient thing to do would be to setup your new blog as a template, so that you can clone it onto any new site that you develop. Although that might sound daunting, it is a whole lot more straightforward than you think – just follow these simple instructions.

What Do YOU Do With A New WordPress Install?

We all have our different habits, and there is no doubt that some of you will have a different way of going about things than the steps covered above. So if you have any good suggestions as to what WordPress users should do when first setting up a new site, let us know in the comments section!